CI/CD
Important Links
What is CI/CD?
The term CI/CD is composed of two acronyms, namely Continuous Integration, and Continuous Deployment.
In a nutshell, Continuous Integration is responsible for the continuous insertion of new code into an existing code base. You are already familiar with this. An example of this is the development of a new feature in a separate branch in an existing repository. Continuous Integration also includes ongoing testing as well as ongoing builds of the new code base created by the changes. This ensures that new builds will run properly. We in the UniApp team use this phase by pushing new code into one of our repositories and having it tested and built completely automatically by the GitLab-runner.
Continuous Deployment refers to the completely automated delivery of production-ready builds into a production infrastructure. An example of this is the uploading procedure of website files into a web server without the need for a web server administrator.
To take advantage of automated testing, builds and deployment, some preliminary work needs to be done. This work consists of defining the pipeline scripts that later will be executed on the GitLab-runner. You will find in many repositories a .gitlab-ci.yml file in which the automated workflow of a pipeline is defined. For further information visit: GitLab CI/CD docs.
What is a CI-Pipeline?
The magic behind CI-Pipelines (and why everybody loves them) is that, basically, they are only some scripts having a specific git-based trigger. So we could trigger a script on each push, which executes our test script after some preparation.
The CI-Pipeline is defined in the .gitlab-ci.yml. I will sometimes call this file the specification. The cool thing about it: Even the specification of the pipeline is under the control of the versioning. A big advantage of this: when we change something in our pipeline on some branch, the other branches are build with the old spec until we merge them. The reason: the second branch still contains the old spec.
Runner 🛠️
In GitLab, Runners run the jobs that you define in .gitlab-ci.yml. A Runner can be a virtual machine, a VPS, a bare-metal machine, a docker container or even a cluster of containers. GitLab and the Runners communicate through an API, so the only requirement is that the Runner’s machine has network access to the GitLab server.
A Runner can be specific to a certain project or serve multiple projects in GitLab. If it serves all projects it’s called a Shared Runner.
Find more information about different Runners in the Runners documentation.
—Gitlab Quickstart
Go to Gitlab Quickstart.
We have two active runners in the backend project: the studci-docker and the Uniapp-CI. The latter runs in a docker container on the uniapp server.
Stages
One of the basic concepts of pipelines are the stages. They group up several jobs of your pipeline. The pipeline runs through the stages in a predefined order. A specific stage is only executed if the previous stage was successful. All the jobs inside a stage are running in parallel.
In GitLab CI the stages are defined on root level (means not inside any component like a job). Here is an example:
Stages in gitlab-ci.ymlstages: - build - test - deploy
The example above is also the default configuration of GitLab CI.
Jobs
The real executed magic is placed in the jobs. They are the most fundamental element in the .gitlab-ci.yml file.
Jobs are: - Defined with constraints stating under what conditions they should > be executed. - Top-level elements with an arbitrary name and must contain at least the script clause. - Not limited in how many can be defined.
—Gitlab documentation
Stolen from Gitlab documentation.
Basic example:
jobName:
  script: "echo do some magic"
Jobs are defined to be part of a stage with stage: <stagename>.
With the keywords only/except you can decide if a job should be used on a specific trigger event ref (branch/tag/…). More information.
There are many other parameters that could be used in this place. Some of them are explained later while running through the spec. You can find the whole list here.html#configuration-parameters).
UI
You can access the run pipeline via the GitLab UI. They are located in the backend project under CI/CD > Pipelines. Here you can see every pipeline that has run recently. Under CI/CD > Jobs you can see all the jobs that have been run.
If you click on a pipeline (on the site mentioned before) you can see the overview of the pipeline. Also, there is a visualization of the stages (and the jobs) that are part of the pipeline. You can also see the current state of the pipeline. After clicking on a job of the pipeline, you can see the log of the job.
On the site Settings > CI/CD you can find some configurations of the CI-Pipeline. You can configure the runners, set some variables (which will be available in all pipelines as variables) and more. This variables may be protected (only usable in pipelines on protected branches or protected tags) and/or masked (will be replaced in logs etc). Protected tags and branches are defined in Settings > Repository. For us the branches dev and master and the tags that are matching v* are protected.
CI/CD pipelines in our group
Disclaimer
Please note that this part of the documentation gives you a rough overview of how the pipelines work. The purpose of this documentation is not to describe the pipelines exactly command for command. After reading this documentation you know what your pipeline does. If you want to understand your pipeline more technically, please open the yml files in your repository. There you can find the technical definition with comments which additional information in the comments.
In the most repositories in our Gitlab group we use pipelines. This section should assist you as a newbie to get a mental model of how the pipelines in the repositories work. Therefore it is divided into several subsections which are exactly named as the repositories in our Gitlab group.
Android repository
Todo
@Android Team: Write something about your pipelines.
Common repository
Meeting Protocol Deployer
The Meeting Protocol Deployer (MPD) automatically archives meeting protocols a day after the meeting. The meeting protocols are stored in the Common repository which is a Gitlab repository. The MPD automatically creates a new commit and pushes it to a new branch. Finally, the MPD creates a new merge request and assignes the current protocol officer to the merge request.
All of these tasks had to be done manually in the past, which means that the protocol officier had to create a local repository, add a new file, copy and paste the content from the pad to the new file, commit the changes, create a merge request and merge the changes. After the implementation of the MPD, the tasks of the protocol officier reduced to write and validate (the MarkDown syntax of) the protocol and confirm the merge request.
So, the protocol officer can concentrate on reviewing tasks and does not need struggle with automizable chores. Further advantages are that the MPD is highly adaptable and easily maintainable. It is always punctual and consequent on its deadlines and it also prevents some type of mistakes.
How it works?

The MPD uses 3 components. The Gitlab Pipeline Scheduler triggers the Gitlab CI pipeline which runs the job to archieve the protocol. And the collaborative notepad - called StuVe Pad. We will reference each step shown in the above figure. For example: “Do something (1.)” references step “1.” in the figure.
Let’s look into the details. The scheduler of gitlab can be found under Gitlab » CI/CD » Schedules. The page lists all schedules. At the moment, there is only the schedule for the MPD which is called Meeting Minutes Archive. A schedule is defined by an interval pattern, a timezone, a target branch, variables and its activeness state. The schedules triggers the pipeline defined in the .gitlab-ci.yml depending on its interval pattern.
The pipeline includes the job called archiveProtocol (1.). Please note, that the pipeline includes jobs depending on rules. Refer to the following rule to include the job to the pipeline when its triggered by a schedule:
rules:
    - if: '$CI_PIPELINE_SOURCE == "schedule"'
After the pipeline includes the job archiveProtocol, several tasks are run inside of the job. At first, the local git repository is configured. The configuration sets the remote URL of the repository and a git user for the bot account which represents the MPD.
The content of the pad is requested via curl (2. + 3.) and is written to an empty file. When the protocol is successfully stored in a file, the job checks whether there is a valid protocol. In our limited context, a protocol is valid if the date of its headline is within a certain range of days before the current date (when the job runs). Therefore, the date of the protocol is extracted from the file and the difference between the current date and the extracted date is calculated in days. If the difference is between mpd_min_diff and mpd_max_diff, the protocol is valid and can be archived. Here, ‘between’ means inclusively the limiting values. Otherwise, the job exits with a warning.
If the job considers the protocol to be valid, we rename the file using the naming scheme for protocol files. The naming scheme looks like:
YYYY-MM-DD.md

Y = year
M = month
D = day
After renaming the protocol file, the job checks whether a branch for that particular job already exists. If a branch exists it well be removed to cleanly add the downloaded protocol file. This check allows us to overwrite the committed protocol after the schedule is triggered. You can use this to update the protocol by manually triggering the schedule after a change to the protocol.
When the file is ready to commit, a branch referencing the date of the protocol in its name is created and checked out. The file is added and a commit is created. The commit message also references the date from the protocol. Then, the commit is pushed to the remote repository (4.).
Last but not least, the job creates a new merge request using the APIv4 of Gitlab. The merge request has some predefined properties. It references the date of the protocol in its name and description. The source branch will be removed after the successful merge. And the merge request is assigned to the user identified by the MPD_ASSIGNEE_ID.
Important
The job requires an access token to access the API for the purpose of creating a merge request.
Components
The MPD uses a variety of scripts, variables and mechanisms. In this section, we show where they are and how to change them.
- Gitlab Schedules
Goto to the project’s Common repository switch to CI/CD » Schedules using Gitlab’s menu. Then check for a schedule named Meeting Minutes Archive. To edit the schedule, click on ✏️ on the right of the schedule’s name.
- Gitlab CI Pipeline
The pipeline is stored in the .gitlab-ci.yml. You can modify the tasks of the deployer or the checks, such as some variables here. We recommend to clone the repository for this purpose and modify the file locally.
- Gitlab CI Variables
Goto to the project’s Common repository switch to Settings » CI/CD and expand the section “Variables”. All variables for the MPD follow the naming scheme
MPD_VARIABLENAME. Refer to the Gitlab Docs for more information about CI/CD variables.
Configuration
This section only covers a subset of variables and settings, that are required for maintenance. A list of all changeable variables is located in the section Reference of Variables.
How to change the assignee?
The API uses the user ID from Gitlab to assign merge requests. The user IDs are usually hidden and can only be accessed via the API of Gitlab. We will get the ID of the user by searching for a user by its username. After that, we update the ID of the user via the dialog for Gitlab CI Variables.
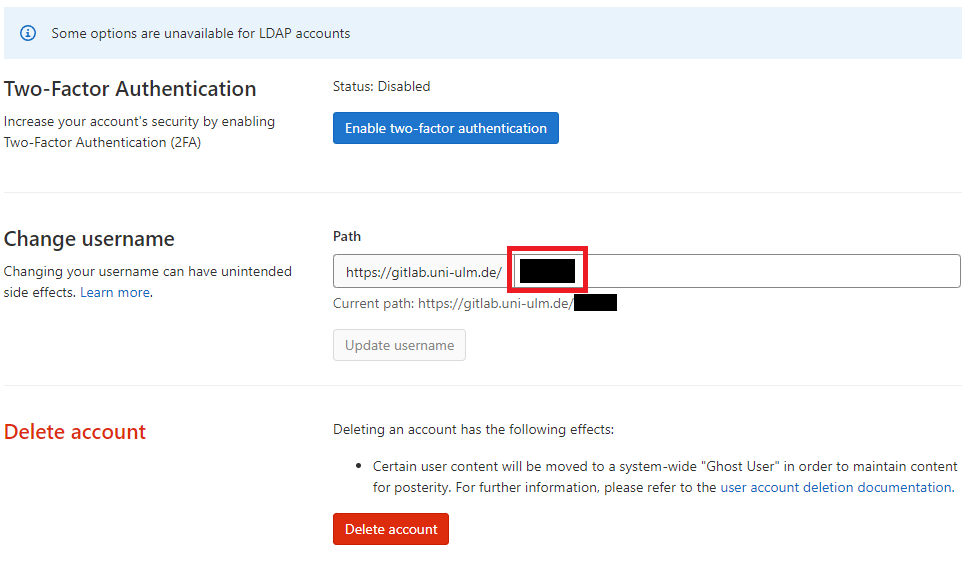
First, check for the username of your preferred assignee. To get the username, you can either check Groups » UUlmApp » Members or you can ask the respective user to look up his or her username on User (Icon at top right corner) » Edit Profile » Account. The latter is displayed in following picture and the masked username is marked by a red circle.
Please note the username of the assignee. Open you browser and copy the following link into the URL field.
https://gitlab.uni-ulm.de/api/v4/users?username=<username>
Replace <username> by the username of the assignee. The browser will request the user from the API and will display a JSON object as response. The response will look similar to following example for the user john.doe:
[{"id":12345,"name":"John Doe","username":"john.doe","state":"active","avatar_url":"https://gitlab.uni-ulm.de/uploads/-/system/user/avatar/12345/avatar.png","web_url":"https://gitlab.uni-ulm.de/john.doe"}]
When you successfully requested the user via the API, copy or note the ID (here: 12345) and switch to the dialog for Gitlab CI Variables. Then edit the variable MPD_ASSIGNEE_ID by clicking on the ✏️ to its right.
Empty the field ‘Value’ and paste the ID of the assignee into the field. To confirm the change, click on “Update variable”.
How to change the schedule?
Open the dialog for Gitlab Schedules. Click on ✏️ to the right of the schedule named Meeting Minutes Archive. A model dialog opens which is displayed in following screenshot:
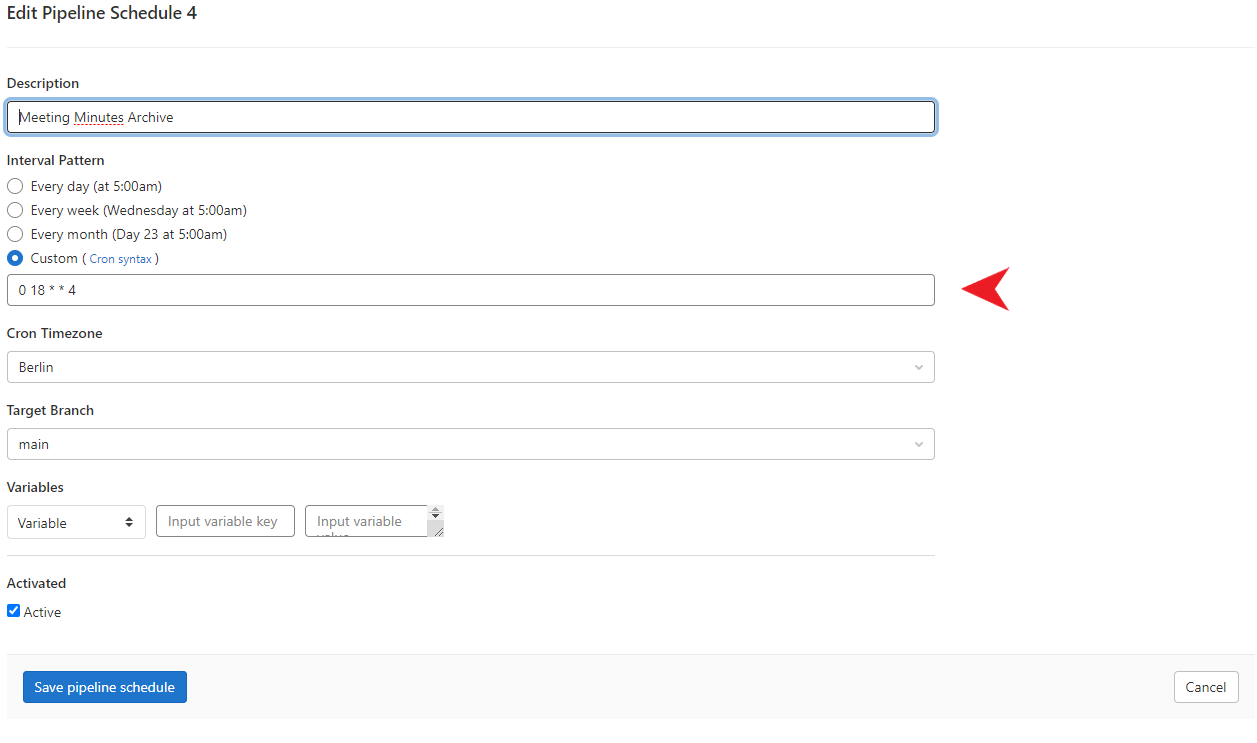
Typically, the maintenance focuses on the interval of the schedule, since the interval needs to be adapted to the meeting interval. We marked the field for the interval pattern with a red arrow in the screenshot. The syntax might be common to you, but do not worry if not. It is the default cron syntax. Enter the interval you prefer and click on “Save pipeline schedule” to complete the process.
Other attributes of the schedule that can be changed are the timezone, the target branch on which the pipeline is executed and variables that should be passed by the scheduler to the pipeline.
If you want to deactive the schedule, simply uncheck the checkbox at the end of the dialog and confirm the change by clicking on “Save pipeline schedule”.
How to change the address of the pad?
Please look up the export URL of the pad. The export URL typically is found in the API documentation of your pad. Copy the URL and open the dialog for Gitlab CI Variables. Click on the ✏️ to the right of the variable MPD_EXPORT_URL. A dialog opens. To update the export URL, empty the property value and paste the export URL of your pad into the field. Then, click on ‘Update variable’ to complete the process.
How to change the limits for the time difference?
To change the limits for the time difference, you have to update the variables mpd_min_diff and mpd_max_diff in the .gitlab-ci.yml. Remember that both limits are integers, that represent the difference in days. Also keep in mind that mpd_min_diff MUST be less or equal to mpd_max_diff.
Reference of Variables
In comparison to the previous section, we shortly summarize all variables which are used in respect to features of the MPD.
Variable |
Type/Location |
Description |
|---|---|---|
MPD_ACCESS_TOKEN |
The API access token which is required to create merge requests. |
|
MPD_ASSIGNEE_ID |
The Gitlab ID of the user to which the merge request shall be assigned. |
|
MPD_EMAIL |
The email address used by the MPD to commit its changes. |
|
MPD_EXPORT_URL |
The URL to the API of the collaborative pad to export the content as text. |
|
MPD_SSH_PRIVATE_KEY |
The private key which is required to access and push to the repository. |
|
MPD_TARGET_BRANCH |
The name of the target branch for the merge. We recommend to use |
|
MPD_USERNAME |
The username used by the MPD to commit its changes. |
|
mpd_min_diff |
The limit for the minimum difference between protocol date and the commit date. The limit is an |
|
mpd_max_diff |
The limit for the maximum difference between protocol date and the commit date. The limit is an |
|
filename |
The name of the file in which the protocol is stored. |
|
branchname |
The name of the branch which is required to commit the changes and create a merge request. |
iOS repository
Todo
@iOS Team: Write something about your pipelines.
Laravel Backend repository
Todo
@Laravel Backend Team: Write something about your pipelines.
Map API repository
The Map API repository contains three Maven submodules which are the REST API server, nodeupdater and the nodeprinter. If you are not familiar with these submodules please read the Getting-started on MAP API Back End documentation to get more information about the structure of the project. This chapter assumes that you know the structure of the Map API project.
The used pipelines are similarly structured as the submodule structure of the Map API project.

If an event occurs which is a able to trigger Gitlab pipelines the Gitlab runner will check the definitions in the .gitlab-ci.yml file in the root of the project.
This previous mentioned file is the starting point of every pipeline.
We use this .gitlab-ci.yml to start sub-pipelines which are Server Pipeline, Node Updater Pipeline and Node Printer Pipeline.
These sub-pipelines do the actual work.
In short: The .gitlab-ci.yml contains stages which are only linking to sub-pipelines that the actual work.
Server Pipeline
All the work which is done by the server pipeline is defined in the .gitlab-ci-server.yml file and is triggered by the main pipeline which is defined in the .gitlab-ci.yml file.
The server pipeline helps us with the automatic deployment of three version types of our server software on our uniapp bwCloud instance.
We differentiate between the version types beta, dev, and release.
Do you don’t know why we use these three different version types and what they do?
To answer this question we have prepared the Deployment of new server versions guide for you.
For more information about our server structure, you can read the System Administration documentation.

The behavior of the server pipeline differs according to the starting condition of the pipeline. Independent of the version type the pipeline will build internally a JAR file and loads it into a new Docker image. Later the Docker image will be processed according to the version type.
The pipeline deploys the beta and the dev version type of the server without further user interaction after the pipeline was triggered.
To deploy the dev version only a merge of changed server code into the dev branch is required.
If you want to deploy the beta version of the server you must create and push a tag whose name corresponds to the regular expression ^v[0-9]+\.[0-9]+\.[0-9]+-beta(\.[0-9]+)?$.
To deploy the production version of the server you must create and push a tag whose name corresponds to the regular expression ^v[0-9]+\.[0-9]+\.[0-9]+-release$.
After some time you must start the deployment to the bwCloud server manually.
In our Deployment of new server versions documentation, you can find more information about the deployment process.
The following part describes each used stage of the figure above:
- 1. compile
In this stage, Maven is used for building a JAR file of the server submodule of the MAPI project.
- 2. build
The newly created JAR file of the previous stage is taken here and put into a Docker JDK image. Then the Docker image will be uploaded into GitLab’s container registry. This is supported by the Kaniko Kaniko project.
- 3. deployDev/deployBeta
In this stage, the dev/beta version of the server will be started in a docker container on our remote.
- 3. deployProd
The only purpose of this stage is the triggering of the sub-pipeline which is defined in the
.gitlab-ci-server-deployProd.ymlfile.- 4. deployProd
With a click in GitLab’s CI/CD pipeline section, the deployment process of the release version will be started. After then the GitLab runner establishes a connection to the
uniappbwCloud instance and pulls the Docker image of the latest server.- 4. stopProd
With a click in GitLab’s CI/CD pipeline section, the current running server of the previous
deployProdstage will be stopped.- mapETL
The single job pipeline establishes an SSH session with our
uniappbwCloud instance and executes a bash script on this instance.
Node Updater Pipeline
The Node Updater pipeline is defined in the .gitlab-ci-nodeupdater.yml file which is triggered by the .gitlab-ci.yml file.
If you want to edit the Node Updater pipeline please use the .gitlab-ci-nodeupdater.yml file for that.

The Node updater pipeline is defined here and divided in the two parts building part and using part which are described in the following chapters:
Building part
The building part of the Node Updater pipeline is triggered by changes in the Node Updater
source code after merging into the dev-branch.
The building part builds a JAR file of the Node Updater.
This JAR file is later inserted into the Node Updater Docker image in the creation procedure.
After the Docker image is created, the new image is uploaded to Gitlab’s container registry and this new image can be
accessed at any time.
The Gitlab container registry is similar to Docker’s service, called Dockerhub.
However, Dockerhub comes with the disadvantage, which is that only a private repository can be created for a given
Docker image in the free version. However, our UniApp project requires multiple Docker image repositories, which makes
Dockerhub unsuitable for us. For this reason, we use Gitlab’s container registry, which does the same job for us as
Dockerhub and is already included for free.
The Gitlab MAPI container registry can be accessed
here or in any Gitlab project under Packages & Registries > Container Registry.
For further information, you can read the Gitlab documentation about the Container Registry
here.
Now let’s talk about all the stages which are created after a trigger (changes in the nodeupdater submodule). The following stages will be created:
- 1. compile
As the name already says, the Node Updater codebase will be compiled and cached while running the following stages of the build part.
- 2. test
The defined unit tests in the submodule will be executed. You can define new test cases in further development as well. The maven-surefire-plugin is used here and defined in the pom.xml of the Node Updater submodule.
- 3. buildJAR
The Node Updater is packaged in an executable JAR in this stage, which can be run independently of Docker. This is especially useful if you want to upload QR nodes independently of the pipeline yourself using the Node Updater. For this reason, the created JAR can be downloaded as an artifact at any time on the overview page of the MAPI Gitlab project. To do this, click on the download arrow on the overview page and navigate down to Download artifacts. How the JAR should be built is specified in the pom.xml file.
- 4. buildAndPushDockerImage
The previously created JAR is included in the Docker image. For that we use the tool Kaniko. The created Docker image is pushed to the Gitlab container registry. Here we use two tags, namely the
latestand the short version of the SHA hash of the relevant commit. The former is meant to always specify the current Docker image. The second tag with the hash value is meant to be able to retrieve a created Docker image at any time. How the Docker image should be built is specified in the Dockerfile in the nodeupdater submodule.
Using part
The using part of the Node Updater pipeline is triggered by changes in the
node.ods file after merging into the dev-branch.
This pipeline supports us to push all the nodes of the spreadsheet file into the MySQL database.
The latest Docker image will be pulled from the Gitlab container registry and executed, which was previously pushed to the container registry in the building part.
During execution, the nodes.ods file and MySQL connection and credentail data are passed to the Docker container.
The container reads the QR nodes, connects to the MySQL database, and loads the QR nodes into the database.
Change MySQL server parameters
If you want to change the hostname, port, user or password of the database, please don’t forget to update the Gitlab CI/CD variables which are listed in the following chapter. If you change the location of the nodes spreadsheet file please do not forget to update the CI/CD variable which contains the path to the nodes spreadsheet file.
Node Printer Pipeline
The Node Printer pipeline is very simple and consists of only one stage.
This pipeline is triggered if changed Node Printer code is merged into the dev branch.
Within the single job the nodeprinter submodule is built and linked as downloadable artifact in GitLab.
Reference of Variables
The following table contains all used variables of the MAPI repository:
Variable |
Location |
Description |
|---|---|---|
CI_NODE_DB_HOST |
The hostname or IP-adress of the MySQL database. This value is passed on the |
|
CI_NODE_DB_PORT |
The port of the MySQL database. This value is passed on the |
|
CI_NODE_DB_USER |
The MySQL database user of the MAPI node table. This value is passed on the |
|
CI_NODE_DB_PW |
The password of the user of the MAPI node table. This value is passed on the |
|
CI_NODE_ODS_PATH |
The path of the ods spreadsheet file which contains the nodes. This value is passed on the |
Operations repository
Todo
Write something about the pipelines.