Getting-started on Laravel Back End
Recommendation
If you are using Windows 10 I recommend to use wsl2 (You will then need to follow the guide below for linux). For installation look here.
Setup local development environment
1. Install PHP (On Windows/Ubuntu e.g.)
Currently, the project is using PHP 8.0.
If you are using XAMPP later just install it in the first place with the PHP version.
If some error occur (in later steps) you may have to install some php extensions. You can do that with the phpenmod {extension} command on linux or by uncommenting the line with extension={extension} in the php.ini (on windows). Some of the packages come preinstalled with the os. Others must be installed manually.
Enable following PHP Modules in your php.ini:
curl
fileinfo
gd2 (phpX.X-gd)
mbstring
mysqli
openssl
pdo_mysql
sqlite3? for tests necessary?
How to upgrade PHP if you’re still on PHP 7.0
Download a new Version of XAMPP from SourceForge <https://sourceforge.net/projects/xampp/files/XAMPP%20Windows/8.1.12/>. Leave it in your Downloads folder and don’t rename anything.
Now open both your old xampp folder and your newly downloaded xampp folder. Replace the php folder from the old XAMPP installation with the php folder from the new downloaded xampp version
Inside your old XAMPP folder go inside the apache/conf/extra folder. Do the same inside the new downloaded xampp version. Replace the old httpd-xampp.conf file with the httpd-xampp file from the new xampp version.
Restart XAMPP and start the Apache server. Everything should work now.
You can check the current PHP Version in any cli with “php -v”. You should have the PHP 8.1.12 installed.
If you have problems with the unit tests that the “imagecreatetruecolor is an undefined function”, you should add the PHP GD extension to your PHP. To do so you have to open you php.ini file inside your xampp/php folder and search for “extension=gd”. Them remove the semicolon from the start of the line. Then restart your apache server. The tests should go through now.
NOTE: replacing the folder may cause some issues for php to find the riht path as it will still try to access the folder where xampp was first downloaded. If you are experiencing this issue, just start with a fresh installation and follow the following steps below.
2. Install Git
Install git by following the official instructions. Clone the repository:
git clone https://gitlab.uni-ulm.de/SE/UniApp/Backend.git
3. Install composer (on windows & ubuntu)
To make our life much easier we use a Dependency Manager. Therefore we use composer. Please download composer from their download page and install it following their instructions. After the installation run .. code-block:: bash
composer install
To install all dependencys to keep possible potential issues to a minimum.
4. Install IDE (e.g.: VSCode or PHPStorm)
For the Backend, you also need an IDE. You can chose whatever you want.
VSCode Visual Studio Code is free and open source IDE developed by Microsoft. The core of the IDE is very lightweigth but has an extension for nearly everything. For VSCode we added the extension recommendations in the repo (
.vscode/extensions.json). VSCode will notify you about this recommendations.PhpStorm PhpStorm can be used as a 30-Day-Trial. As a student you also have access to a student version for free. Once you have PhpStorm, you can simply open the Backend-Project after you cloned it. As we used prettier (see below) we recommend to install the prettier plugin. We recommend to use the Laravel code style guide for PHPStorm. You can find it here.
Crtl + Shift + Alt + Lwill format your code according to the code style guide.
For linting and similar we use Prettier.
We added the configuration to the repo (.prettierrc).
5. Install & Setup Database
SQL client
For easier development and maintainance it’s recommended to use a SQL Client. With a SQL client you can view your databases, alter the data, view the data and much more. There is no need to have the client started at all, but it can be incredibly helpful to verify that your data in the database is correct and that all databases are set up properly. After you connect to your database, you can see all available tables.
DB server
The UniApp uses MySQL as database. So there are mutliple options to run the database on your local machine.
Option 1 - Install the official server on your local machine One option is to install the official MySQL client. You can find the official guide and all the downloads in the official docs. You can also use MariaDB (a fork of MySQL).
Option 2 - DB in Docker container
If you don’t want to mess up your machine with you can also run the database in a docker container.
Please follow the official instructions to install docker.
Afterwards you can pull the official image of the database of your choice: docker pull mysql or docker pull mariadb.
Now you can start your database instance. (You can also use a password in the commands below)
For MySQL:
docker run --name uniapp-db -e MYSQL_ALLOW_EMPTY_PASSWORD=1 -d -p 3306:3306 mysqlFor MariaDB:
docker run --name uniapp-db -e MYSQL_ALLOW_EMPTY_PASSWORD=1 -d -p 3306:3306 mariadb.
Warning
I had to run the following statement on the database (when using MySQL) as PHP has some issues in authenticate against MySQL.
ALTER USER 'root'@'%' IDENTIFIED WITH mysql_native_password BY '';
Option 3 - XAMPP XAMPP is a suite of web tools that includes Apache, MariaDB (= MySQL fork) and PHP. So you can use the database from this stack. <<<<<<< documentation/sphinx/source/gettingstarted/intro_backend.rst ======= I will come back to that later. >>>>>>> documentation/sphinx/source/gettingstarted/intro_backend.rst
Setup
You can use your SQL Client or the command line for creating the database. The default connection to connect to the database server is:
Host:
localhostPort:
3306User:
rootPassword:
<None>Please set the collation to
utf8mb4_general_ci.
6. Configuration
Environment
The Backend of Uniapp ist configured with a .env-File.
You can find a default configuration (/config/envs/.env.local) in the repo. To use this configuration you have to copy this file to /.env (in project root directory). In this file you can adjust the configuration for your environment. Most of the default configuration should be just fine as it is. The only configurations you have to update are the DB configurations.
App keys
For example for encrypting session data, Laravel needs an “app key” that is stored in the .env as well. Handily, Laravel’s artisan can just create one for you. For that, open a shell (Git bash, Powershell) in your Backend project’s root directory, and run
php artisan key:generate
You also need a JWT Secret. Generate this with the following command:
php artisan jwt:secret
7. Migrate & Seed DB
Before you can start the backend server you have to run the migrations. Migrations are used to setup the database structure. They can also be used to alter the database structure for later versions.
To run the migrations call php artisan migrate.
If you want to reset your database you can use php artisan migrate:fresh or php artisan migrate:refresh.
To fill your DB with some dummy data you can use the seeds. You can seed the DB by calling php artisan db:seed.
You can also migrate and seed the database with one command:
php artisan migrate --seed, php artisan migrate:fresh --seed or php artisan migrate:refresh --seed.
You should now have a database with a lot of tables and the most tables should have at least some data.
8. Install Node.js and npm
To see if you already have Node.js and npm installed and check the installed version, run the following commands: .. code-block:: bash
node -v
npm -v
You can use a Node installer to install both Node.js and npm on your system.
9. Artisan serve
You are now ready to run the server!
To start the development server call php artisan serve.
Attention
This is not the way a laravel backend should be run in production. Use a webserver like apache2 or nginx for that.
The Webpage should now be reachable under http://localhost:8000/. The backend should be reachable over http://localhost:8000/api.
10. Swagger
Swagger is used for the API-Development of the App. It contains all defined API-Routes that can be tested and executed with an API-Secret available in the database. Generally Swagger references the api-documentation of the project, and is deployed via merge into the alpha-Branch.
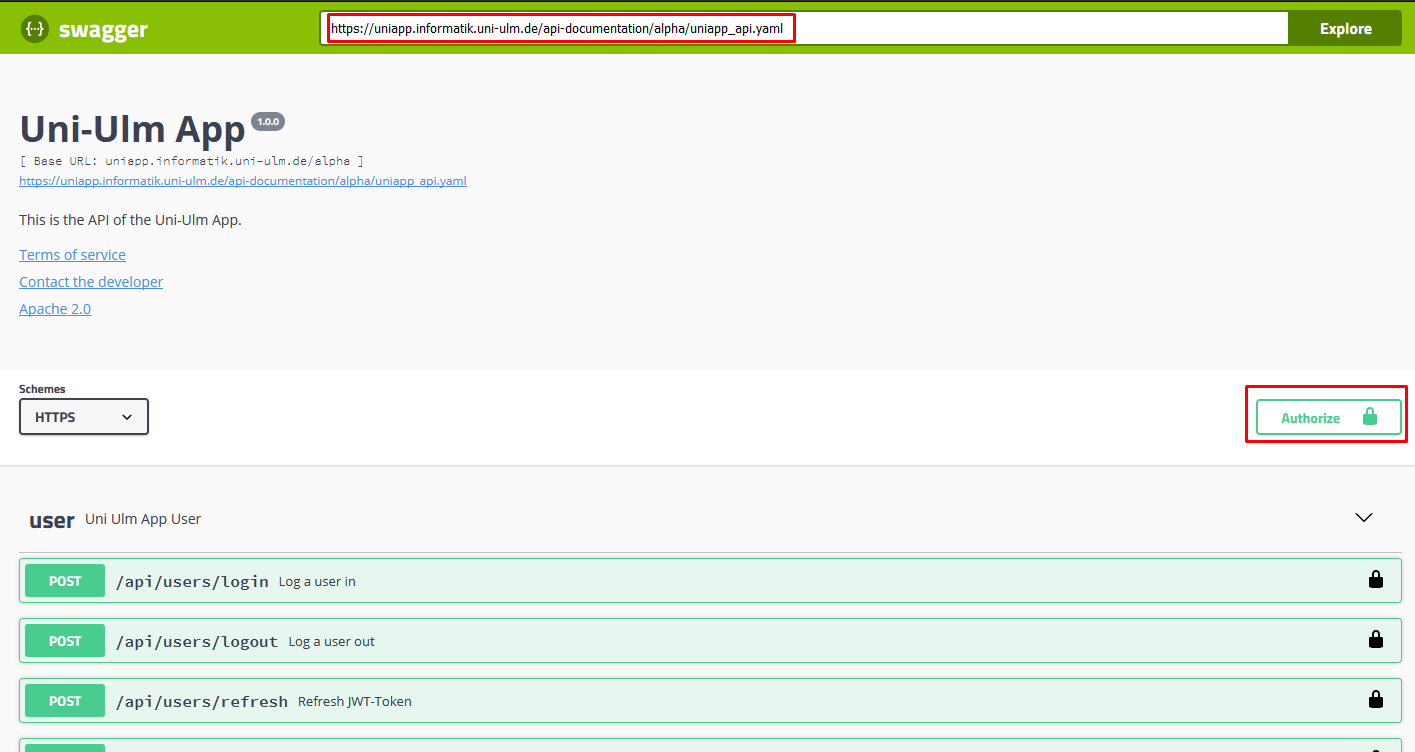
As soon as you enter your api_secret under Authorize, you can test and use the API as you like. The api_secret can be found in the Uniapp_Keypass.kdbx. If you change the URL in the bar, especially the part with alpha to beta or prod, you can use the API that is used in their respective environment.
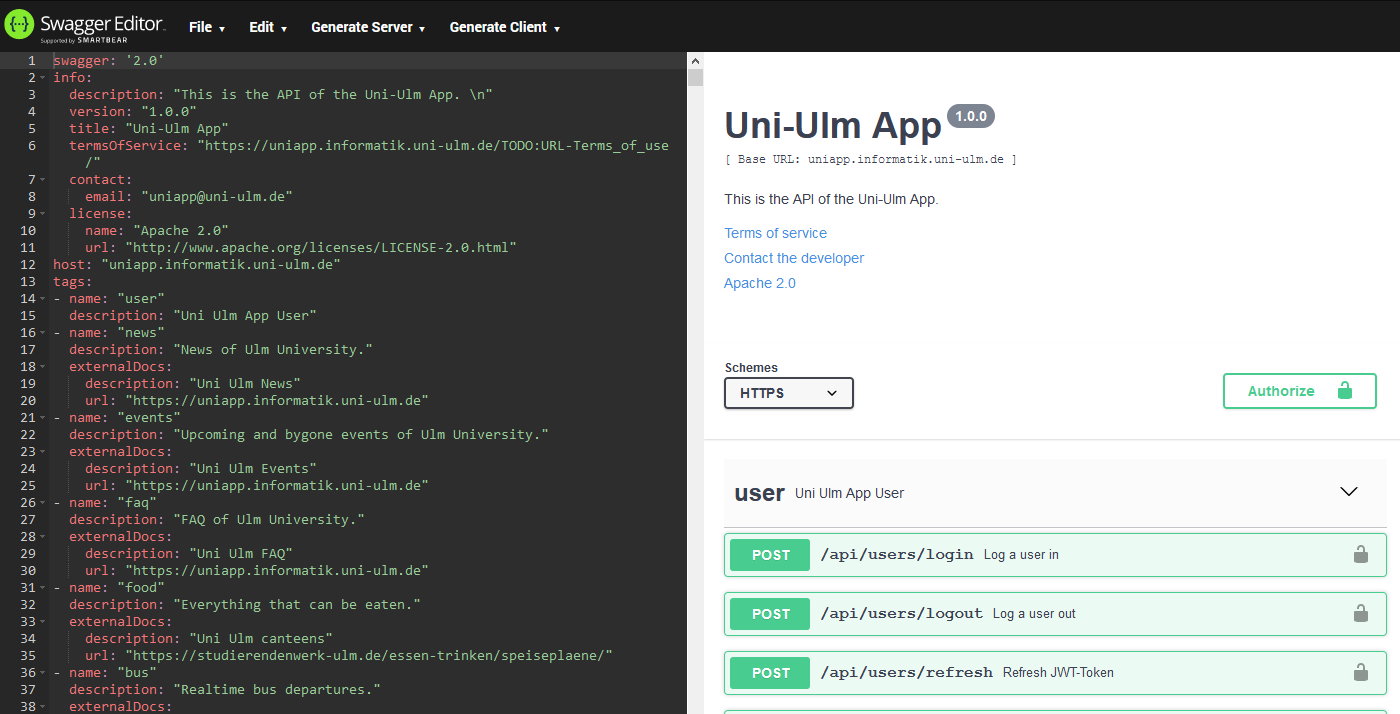
For updating the api-documentation, Swagger Editor is recommended. It is split into a textpart and a preview that reacts to the changes made in the textpart.
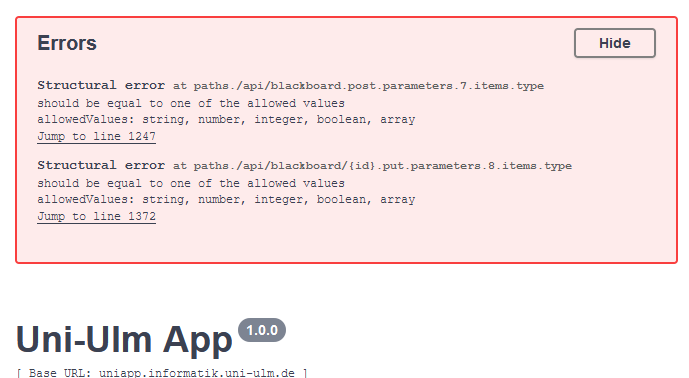
Swagger Editor shows you the errors with your file at the top of the page. Generally, you HAVE to fix semantic errors, otherwise your API will not work properly. Structural Error should be fixed, but there can be instances and exceptions where this might not be possible. Currently there are two Structural Error, because Swagger does not support an array of files/pictures.
If you open Swagger after a deployment, it might be that the webpage did not reload. If this is the case, you can try to
Press STRG+R to refresh the page.
Open Swagger in anonymous-mode with your browser.
Empty your cache.
If nothing helps, the chance is high that you deployed a file with semantic errors!
11. Postman
Postman is a tool that allows to send API-Requests to an API. This means, if you start the server, you can test your routes and URLs and also the responses. This is only needed if you actively want to test your routes. If you do this, the server has to be online - This means starting XAMPP and the MySQL-Module as well as using php artisan serve in the Backend folder as command.

In this picture you can see a GET-Request sent to api/blackboard/categories. You can pass parameters as well, for routes that require those. If you use Postman for the Backend, please remember that you have to provide the api_secret with every request. You can find the api_secret in the database in the table “api_secret”.
Import HTTP requests from Swagger to Postman
There are lots of HTTP requests to be sent. To make your life easier, you can easily import all of them from Swagger to Postman in one step with the following steps:
Open Postman and click on the “Import” button in the top left corner or use the shortcut
Ctrl+O
2. Click on “Link” and paste the following link into the input field: https://uniapp.informatik.uni-ulm.de/{version}/openapi.yaml
(Note: change {version} to the version you want to import, e.g. dev)
3. Open “Show Import Settings”. In there, make sure the following options are selected: Copy collections to workspace. Otherwise, the imported collections will be saved in your Postman account and not in your workspace. Then, click on “Import”.
The collection containing all the requests should now be visible in your workspace.
5. To use the requests, you have to add your api_secret to the header of each request. Click on “University Ulm UniApp Backend”, which should be the root folder of the workspace.
Then, change Type to ‘API Key” and add the key name api_secret.
Next, add the value of the api_secret to the value field. Last, change the “Add to” field to “Query Params” (this needs to be changed and is addressed in `Backend#150 https://gitlab.uni-ulm.de/se/uniapp/laravel-backend/-/issues/150>`__).
6. In the “University Ulm UniApp Backend” folder, go the the variables tab.
There you should change the current value of the variable version to the version you want to use.
This is also crucial, as the requests will not work otherwise, as the version is not set correctly with the environmental variable.
(You can most likely change this in your settings but is not necessary, as the version is not changed often or you can just add another variable for the version you want to use).
Then, click on “Update” to save the changes.
Don’t forget to save the changes by clicking on the Save icon in the top right corner.
Alternatively, you can follow the steps in the Postman documentation.
12. Setup Debugging Tools
For debugging php code with a IDE we have to setup XDebug (profiler and debugger tool for php). You can find a easy (and working) tutorial for installation and usage in vscode here (scroll down to debugging).